

Thursday, February 27, 2014
Wednesday, February 26, 2014
A Homeschool Geography Review Asia: It's Peoples and History by Bonnie Rose Hudson

What do you know about Asia and the people groups that live there? Are you looking for ways to talk to your children about persecuted Christians in other countries or how to pray for Asia and it's people groups?
Bonnie Rose Hudson has written a book about the people of Asia and the persecution Christians suffer in the 10/40 window in a way to engage even small children in understanding the troubles some Christians face and how grateful we should feel for our religious freedom!
I have been reading this book with our 8, 6, and 3 year old and even the 6 year old has gained a greater understanding of what even young children face as they choose to stand up for their faith in God. When we started to read about the people of Laos, my 6 year old couldn't believe that children could be turned from their homes or persecuted for their faith. "Mom! It should be illegal for people to treat little kids like that!", he said. Ms. Hudson does a wonderful job of engaging your attention by giving each country a mix of educating information about the region and then sharing stories of children who live there and some of the trials they face each day.

My children loved learning about Sanjoy, a twelve year old boy from Bangladesh who, despite suffering a beating that ended in a broken leg, was able to lay his hurt aside and help lead his persecutor to Christ. We ended up having a really powerful discussion about the light that Jesus places in each of us and how it can shine in even the darkest spots, because the Holy Spirit in inside of us.
There is also a wonderful activities section in the back of the book that has crossword puzzles, memory games, word searches, and map activities. There are also several free suggestions of further information and research on this region for your future homeschool history lessons :)
When asked what her goal is in writing Bonnie Rose Hudson answered; "My prayer is that everything I write would honor God and help whoever reads it know that God loves them and that they are special to Him. There are days we don't feel special. There are days we feel like no one knows who we are or cares how we are feeling. I want my readers to know that God does know, that He does care, and that they are more precious to Him than they could ever imagine."
I have permission to give 2 PDF copies of "Asia: It's People and History" by Bonnie Rose Hudson! Please enter through the Rafflecopter form below for a chance to win a free copy yourself!
There are several ways to purchase your own copy of this book as well! The Old Schoolhouse Store has it and the PDF copy through them is on 25% off sale until 3/15/14 (promo code: 02asia14! and YES the exclamation point is part of the code) Amazon has it as well to purchase for your Kindle. And it is also available at Smashwords. There will be a print version available as well and I will update this post when the information on that is available.

a Rafflecopter giveaway
Some of the links on my blog are "affiliate" links, which I am required to notify you of to comply with FTC regulation. If you click on one of these links and then purchase an item through the link I may receive a small compensation. Thank you!
Some of the links on my blog are "affiliate" links, which I am required to notify you of to comply with FTC regulation. If you click on one of these links and then purchase an item through the link I may receive a small compensation. Thank you!
Tuesday, February 18, 2014
Antibacterial Four Thieves Salve
Here's a recent favorite salve at our house!! And it's super easy and fast to make! If you are at all interested in herbs, you've probably heard the story of the four thieves, who supposedly were able to rob the dead during the Plague and not get sick themselves by using several herbs on their skin and clothing!
These herbs, and their essential oil counterparts, have now been found in some studies to be effective against many bacterial, fungi and viruses without the risk of creating super bugs that develop resistance to conventional germ fighters.*

I blended my own version of the essential oils together by adding equal parts Eucalyptus, Rosemary, Clove, Cinnamon, and Citrus Essential Oil (I have used Lemon, Orange, and Grapefruit at different times) I use this blend in MANY ways. I make a room spray as I explained in this post, I add a few drops to a humidifier when someone in the house has a cold, rub it on their feet or chest (just a few drops with a carrier oil) and I started to use it mixed with a carrier oil as a hand sanitizer when we went out.
It was in this last capacity that made me start to wonder about turning it into a salve instead. It's difficult to get children to rub an oil on their hands without spilling some on their clothes, car seats, etc. And no matter what sort of container you use, oils tend to make a mess of your purse! So I decided to turn this into a simple salve and you can too!

Ingredients
1 cup Extra Virgin Olive Oil
scant 1/4 cup beeswax pastilles
Eucalyptus, Rosemary, Cloves, Cinnamon, and Citrus Blend of Essential oils
You could use a different carrier oil other than Extra Virgin Olive Oil, but first let me make a case for why I made this choice.
Firstly, Olive oil is excellent for your skin! Conventional hand sanitizers dry out your skin, which can make your skin more prone to infection! Dry skin and cuts are a perfect breeding ground for bacteria to hold on and then get in to your skin. Your first and best defense is to keep your skin, ESPECIALLY your hands, well moisturized.
Secondly, Olive oil has antibacterial properties of it's own. You could use plain Olive oil and it will work fine, but the extra-virgin will have more of the beneficial properties of the Olive tree in it.
Thirdly, it's one of the most readily available oils out there! Which makes it and easy ingredient to pick up!
This recipe will take less than a half hour (usually only 5 or 10 minutes except for waiting for the oil to cool!)
Heat the Olive Oil and beeswax in a small sauce pan over medium-low heat until the beeswax pastilles melt completely. I stir occasionally as it melts.
Heat the Olive Oil and beeswax in a small sauce pan over medium-low heat until the beeswax pastilles melt completely. I stir occasionally as it melts.

Take off the heat, and make sure you have a thick enough salve by taking the spoon you stirred it with and placing it in the freezer for 1 min. Then check the thickness of the salve that's on the back of the spoon.

Let the oil sit out on the counter until it's cool enough that you can touch it without getting burned. (around 90 degrees F on a thermometer) It should still be completely liquid. Then add your essential oil blend. It's difficult to give you a precise amount since different oils may be stronger than others. I add about 60 drops, but I go more by smell. When the oil has a distinct smell of the oil blend, I stop. I caution you to not add too much! Cinnamon, in particular, can cause skin irritation if you use too much so better to add too little. You can always slightly warm the salve when it hardens in a hot water bath and then add more after. But it would be difficult to fix if you add too much!

Pour your finished salve into containers. I really like to use glass baby food jars for this. What's ironic about that is that I hardly ever fed my babies pureed foods! =) But I have actually bought several of the fruit purees and froze them as small ice pops for the bigger kids so that I can use these jars. (These ice pops are perfect for calming ouchies ;) )

I keep a jar of this in my purse and after we walk through a store each of us rubs a little on our hands The kids all love the smell and I'm happy knowing that they aren't using something filled with chemicals! I hope your family enjoys it too!
This post is linked up at Simple Saturdays!
*References:
- http://www.ncbi.nlm.nih.gov/pmc/articles/PMC1693916/
- http://www.scielo.br/scielo.php?script=sci_arttext&pid=S1517-83822012000400003
NOTE: I am not a physician and nothing I tell you about on this blog should be construed as medical advice. Not intended to diagnose, treat or cure any disease as according to the FDA. If you have specific questions about how any product/ingredient may interfere with a specific condition or medication, PLEASE ask a medical professional!
Some of the links on my blog are "affiliate" links, if you click on one of these links and then purchase an item through the link I receive a small compensation, Thank You! I am required to notify you of to comply with FTC regulations for bloggers.Thank you!
Wednesday, February 12, 2014
Trim Healthy Tuesdays: Caramel Sauce Two Ways! S
Some of the links included here are "affiliate links", which if you choose to cklck on, and purchase something through those links I will receive a small compensation from. FTC regulations require that I explain this on each post that contains affiliate links.
No, I didn't enter an alternate universe where it is still Tuesday. =) I'm just running behind this week, but don't worry, these recipes are worth the wait! A simple caramel sauce is the main attraction, and I think you'll love both recipes I used it in.
The original recipe was posted on the Trim Healthy Mama Facebook group (I'm sorry I don't have the original post to link), and I "tweeked" it a bit for my own personal tastes.

Caramel Sauce Ingredients
1 can light canned coconut milk (full-fat will work but you are using a LOT of butter here, so light will lower your fat content a bit)
1 stick of butter
1/2 cup Truvia
1 tsp caramel extract (this one if you prefer a naturally flavored one)
 Add the butter, Truvia and coconut milk to a small sauce pan and heat over low heat. Stir occasionally, until reduce by at least half. This took me about 1/2 an hour. The final result is all about consistency, I checked the consistency by taking a small amount on a spoon and putting it in the freezer for a few seconds. Then taking it out and check the consistency. This will NOT turn out like a chewy caramel, but more similar to a mixture between a caramel ice cream sauce and a pudding. Once you reach the desired consistency, take off the stove and add the tsp. of caramel extract. Mix well.
The first way I use this sauce was in a "Caramello" type version of skinny chocolate. My favorite Skinny chocolate variation is:
1 cup coconut oil, melted but not warm
1/2 cup Special Dark cocoa powder
1 scoop protein powder
6 TBS Truvia ground in coffee grinder
I layer the skinny chocolate and caramel sauce in a silicone mold (I used this one), freezing after each layer. Once it's frozen, HERE'S THE SECRET to make it taste like a "Caramello", put it out on the counter for a few minutes before serving and let the caramel get slightly soft. It usually takes only about a minute for me, but I live where it's hot and humid, so if your kitchen is cold it may take a little longer.

Hide these from your kids or they will all disappear!! ;)
Now I put the rest of my caramel sauce in the fridge (where it should last atleast a week). I make a triple batch of the muffin-in-a-mug recipe (page 256 of the THM book) and I cook them in the oven (because we don't own a microwave). I find cooking them at 350 for 8 minutes, turning the oven off, and then leaving them in with the oven closed for an additional 8 minutes, works perfectly to cook them in the oven.
I make 6 muffins which makes each muffin a half size of the original recipe. This makes it more of a snack than a meal, which is exactly what I wanted for a dessert like recipe! I use silicone muffin cups (which is a great tip if you have a small kitchen with limited storage, since they take up less room than a muffin tin and can be place on a cookie sheet!) and store them in the fridge in a Ziploc bag. I actually find a good 12 hours in the fridge brings out the chocolate flavor even more! The only variation I did from the original recipe is to add 1/4 cup of dried unsweetened coconut (don't forget I tripled the recipe!). Please refer to your book for the recipe.

When you are ready to serve, pour some of your caramel sauce on top and add chopped pecans and you have a delicious (and still good for you!) version of Muffin-in-a-Mug.
Please let me know, if you try these recipes and how you like them! I love hearing feedback from you!!
This recipe is linked up on Trim Healthy Tuesdays over at Gwen's Nest.
Tuesday, February 4, 2014
Trim Healthy Tuesdays: Cannoli S
Some of the links in this article are "affiliate links" which means if you click on one and buy something I receive a small compensation, thank you! This is disclosed on the top of every post in accordance with the FTC regulations for bloggers.
Cannoli are a favorite dessert of mine, although I'm pretty sure I don't have one speck of Italian in me! When I was a child we spent our summers camping near the beach and near one particular beach there was a small Italian bakery that we would always stop at and get cannoli and bring it to the beach with us.
We always got the half chocolate/half vanilla with slivered almonds, so that was what I was trying to reproduce with the recipe. I made two EXTREMELY large cannoli with this recipe, and were I to do it again, I probably would cut my tortillas in half and make half as much filling for two people. (so the below recipe would make 4 cannoli)
 Ingredients:
Low carb tortillas
2 cups full-fat ricotta cheese
a few drops liquid stevia (I used Now Brand Better Stevia in French Vanilla)
2 tsp pure vanilla extract
1 TBS cocoa powder
1/3 cup almonds, sliced or chopped
2 TBS butter
2 TBS butter
small shake of real salt
85% dark chocolate for garnish (optional)
Using two bowls, add 1 cup of Ricotta cheese to each bowl, add a few drops of liquid Stevia (I added 4 drops to the vanilla and 6 to the chocolate to counteract the bitterness in the cocoa powder. Add a little and taste! It's VERY EASY to over-sweeten with stevia). Add 1 tsp of vanilla and a sprinkle of salt to each and 1 TBS of cocoa powder to one bowl. Mix well and set aside.

Heat one TBS of butter in a large pan (I used my cast iron) on medium heat and pan fry your low-carb tortilla until golden brown on both sides.
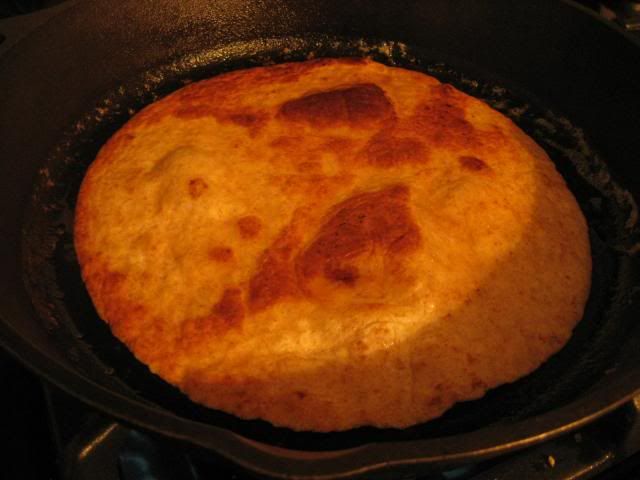

Immediately when you take your tortilla from the heat you need to roll it before it hardens. (if you are cutting your tortilla in half now would be the time to do it) I just carefully twirled mine in a loop, overlapping slightly at the top, and then flipped it upside down on my cutting board and placed a utencil on top of it to hold it there until it hardened (about 5 minutes. Repeat process for second tortilla with second TBS of butter.

When the shells are cool, add your filling. I did chocolate on one side and vanilla on the other. Sprinkle with almonds and garnish with grated chocolate.

These were incredibly delicious, and very similar to those cannoli I remember as a child! Best part? I ate this incredibly decadent dessert last night, and woke up to find I lost 2 more pounds! I love Trim Healthy Mama! =)
This post may contain affiliate links, which, by FTC regulation I must disclose. If you choose to buy an item after clicking on one of these links, I may receive a small compensation. Thank You!
Subscribe to:
Posts (Atom)
_____________________ |
|
Four Thieves Salve
